I’ve been off the HF bands for quite some time. Not because I didn’t enjoy it or anything, just life got in the way and after having my truck break down and needing to sell it, I never had another vehicle to easily put this HF antenna on or easily get to the battery with newer firewalls.
With concerns over expanding emcomm and some local hams talking about HF data modes, I thought it was time to check back into things. I never did data modes before I only ever did voice and I still spend a good time on voice but sometimes keyboard to keyboard or messaging over HF and Winlink has a lot of appeal in possible grid down or local disasters, plus it’s just a lot of fun.
I attempted to use my FT-100D. I did not have luck getting mobile antenna to work at home in the attic, so I decided to get a wire in the air. I did a little research and ended up picking the Par EndFedz Antennas EF-8010. It’s worked great for me on voice however I can’t get great SWR on 80m so I’ve got some work to do there, but SWR is great or acceptable on the other bands. On the data modes but things were not easy and quite frustrating to get working even for a computer guy. I got a digirig and the appropriate cables, but thing still didn’t seem to always decode properly and it would just stop working without reason and I’d have to go back through it almost daily.
I broke down and just got a IC-7300. Other than my DSTAR handheld I’ve never owned or used any Icom radios before but everyone I talked to say this one is easy to use and works very well with data mode and it looked like there was plenty of online support and videos on setting things up so, I pulled the trigger. Most advanced radio I have to date, the waterfall is useful, but it really shines on the filtering and sound. Highly customizable screens are a plus. Data modes are just a pleasure to use now. I’m drawn to the VarAC, JS8Call, WinlinkVaraHF, and a little FT8 when bored.
NOTE: Make sure to match the TX and RX frequencies in the MMDVM_Bridge.ini it needs to function as a simplex node not a repeater for this to work as of 02/10/21.
A lot has changed since my original article and there are new ways to install the tools: Start with Debian Bookworm AMD64.
Make sure you install is up to date apt update apt upgrade if updates were installed, reboot
Install AllStar first apt install allstar errors? stop and ask reboot AllStar working? asterisk -r to login to the asterisk cli to check use asl-menu to do basic configuration
Install DVSwitch Server apt install dvswitch-server errors? stop and ask logout and back in, or reboot run the dvs menu to configure DVSwitch Server When asked for the USRP port, take the default (Just hit enter)
Configure AllStar and DVSwitch Server to taste.
Take your time, read the screen. If you get a error, stop, capture the error and past into a e-mail to the email group at https://dvswitch.groups.io
Since jumping into Digital Modes and hotspots in November of 17 and Allstar stuff in early 2018, I decided to look at setting up something for my club, ALERT, to have EchoLink and bridge it over to DMR so members and ham radio storm spotters without DMR radios could still interact with each other.
There were several considerations made as far as hosting the node and bridge. I considered using my existing raspberry pi but there were some technical challenges with the OS and how you got the bridge software to install and extract. I think it can be done but I didn’t invest further time into it when it gave me trouble. I considered formatting an old windows computer with Ubuntu but after some thought about this being for the club maybe hosting this at home was not the best idea. Even though the title says host in the cloud you can totally do this on an Ubuntu computer at your home to (and if you are ok opening some ports), I’m explaining where mine ended up in this post. So, I chose AWS (Amazon) to host them both. There are also other great host I almost went with if I had heard about them earlier in the process, Vultr and DigitalOcean. I don’t know the AWS cost yet. I do know that I have 1yr free of AWS EC2 and that based on the data stats I may be able to stay in the free tier after that depending on usage. I suspect our usage will be small except during severe weather season so, we have time to watch it. I’ll update down the road when this gets nailed down.
Update on cloud services 02/10/21: AWS is probably the most expensive, after the one year free I’m running about $9~9.50 a month. I’ve helped other guys build bridges on Vultur and they are paying about $5 a month. I’ve also had experience with Virmach and their affordable Linux will run about $12.50 a year which is the best deal however it may not have the memory and bandwidth to support large systems but is great for small but you can get higher plans I haven’t tested the others extensively.
I don’t plan to cover setting up AWS as it’s pretty straight forward after setting up an account. However, I had to do this a few times because the image I chose (trying to get 32bit) cause me more install issues with the Ham stuff. I finally, found out I needed this and 64bit was fine. Also, in later installs after this publication, I have not been able to get ASL working on Ubuntu 18.04 there were some library getting it installed, then after I resloved them ASL didn’t run. I think the ASL team will need to look into later version of debian first (just shooting in the dark). But the following works flawlessly:
Once you get the instance running they give you all the ways to connect to it which I also don’t plan to cover since they have their own guides as part of the setup. You can use your SSH tool of preference. I use Putty and Bitvise (client is free server is not but you shouldn’t need server). For AWS you download a user key (you do not use a username password) that you need to load into your ssh client. For Putty, AWS gives you instructions on converting the key to a putty file. With Bitvise, you just import the .pem file. Once you are in with SSH you can start installing the ALS Software.
The AWS server user logon is Ubuntu (covered in their docs) but so I didn’t have to use sudo all the time I set this after i got in. sudo -s and that switched me to root user.
To intall ASL run this:
Note on linux commands: enter these one line at a time and hit enter. You can cut and paste if your ssh client supports it. Right mouse click in putty and bitvise.
Even thought this guide is for the HamVOIP image most of the manual setup things apply or maybe minor edits. I didn’t rewrite these instructions to fit an ASL install, I just “made it work”.
This is the Bridge software. They actually support bridges to all the digital modes I believe (DMR, C4FM, P25, NXDN, ect). They use a MD380 emulator to get around the hardware requirements of most systems with dongles or boards. Sign up for their email list they will provide great support for your project if you can’t get it going yourself. https://dvswitch.groups.io/g/main
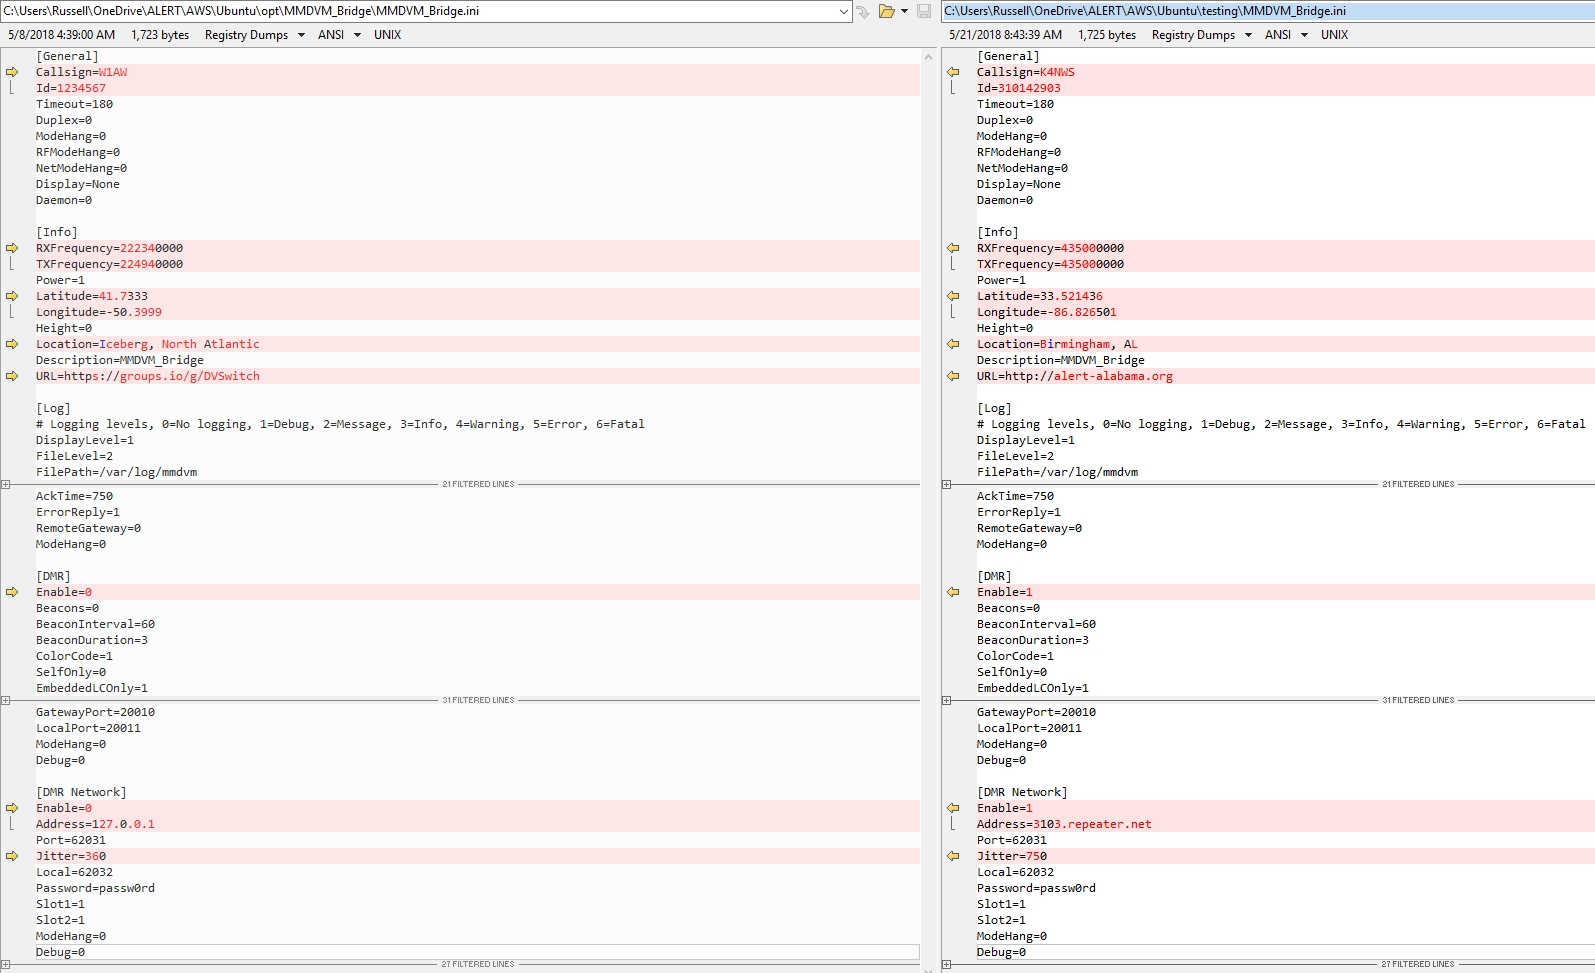
Edit the ini files in the Analog folder and MMDVM folder (I did not have to modify the DVSwitch.ini for this bridge). However, you need to verify what’s in DVSwitch.ini matches what you are trying to use in the Analog_bridge.ini like this:
I used beyond compare to show the difference between the original ini and what i changed to make it work:
The Analog_Bridge.ini allows you to set decoding to the emulator and your DMR information that will also be updated or used from your MMDVM_Bridge.ini
Here are some recommended audio settings in Analog_Bridge.ini:
[USRP]
aslAudio = AUDIO_USE_GAIN               ; Audio to ASL (AUDIO_UNITY, AUDIO_USE_AGC, AUDIO_USE_GAIN)
agcGain = 5.0                           ; Gain (in db) of the AGC filter
dmrAudio = AUDIO_USE_GAIN               ; Audio from ASL (AUDIO_UNITY, AUDIO_USE_GAIN, AUDIO_BPF)
dmrGain = 0.17
MMDVM_Bridge.ini sets up a MMDVM configuration which isn’t much different than setting up the parameters on a hotspot just without the radio. So, you will most likely need to register for the Brandmeister self care website and once setup you need to set your desired TalkGroup as static. In the config your DMR ID is the callsign DMR will see and the Repeater ID is the DMR ID + 01 (or any 2 digits) Note: DMARC is not supported unless there is a D-plus bridge to it.
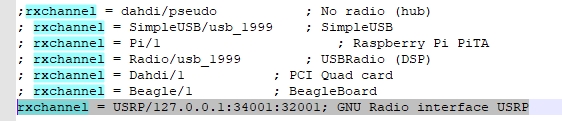
In the rpt.conf turn off the dahdi and enable the USRP lines.
If you have issues there are logs located here to review:
As long as your server/bridge/nodes are running you have a live bridge between the 2 modes. Users on either side will not have to do anything out of the ordinary. AllStar users coming over to DMR do not have DMR numbers so DMR users will see the club/personal number of the number you chose in the MMDVM config.
Hopefully, with that, your AllStar Node and DMR bridge is running!
If not, don’t stress help is an email or remote session away. It’s probably something small that’s stopping it. There are lots of ways to do this and none of it is documented that great but be persistent and ask questions it took me a good week on an off to get mine online and tons of trial and error. Maybe this guide will help you with the concepts and get you going faster than it took me.
After being on and still on the Digital HotSpot craze, I started looking at the Analog options and that brought me to the Open Source AllStar system.
I was actually a little surprised to see how much EchoLink and IRLP are still used for over 20 year old systems. AllStar plays very nice with EchoLink and to a degree IRLP. Most of the IRLP nodes I’ve looked at connects up with AllStar as well.
Based on that site I invested in the equipment and just got it going about 2 days ago. The setup is harder than the other digital hotspots but most of that is because it’s command line Linux that you need to be familiar with or at least be able to follow from the guides. The guides over on HamVOIP are outstanding.
I’m truly at a loss to understand why Google has released yet another messaging platform. I try to give them the benefit of the doubt since Android and Google Voice are my platform of choice but I just can’t seem to see the point of Duo and the yet to be seen Allo.
My first issue is you can only use it on one device. I was able to install it on my phone and my iPad(LTE) but could only be signed in, in one place at a time. I was not able to install it on my Nexus 7 as it wasn’t “compatible”. Talk about a step backwards. As a hangouts user I can run it on any device I have with no conflict. Some argue it’s because it’s using your phone number and not your google account well, a phone number is an account if they did it right. It’s my same complaint with Snapchat, WhatsApp, and ect. For years we seemed to be on the path of device agnostic apps now we are going the other way? Why? Was something broken? Is it too hard? Frustrating to say the least.
I made one video call with it and it seemed no different quality wise than a hangouts video call which i also don’t really use. I typically text and make occasional phone calls rarely do I need/want to video call anyone. It would actually be more useful if you could just make a voice call only option?
Hopefully, I’ll use Allo more if it ever comes out but most likely not if I can only use it on one device. I’m not a fan of SMS. It’s an old outdated messaging service. The only purpose it’s serves is a way to send messages when you are having severe network congestion and your data won’t work and your network phone calls won’t work and maybe you can get an SMS out when everything else fails. However, because all of my contact use it I have to use it but Google Voice makes SMS more like an IM messenger so that’s the appeal to me.
Hangouts remains my messenger of choice for these few powerful reasons:
VOIP done right. Utilizing Google Voice I can take and place calls from any device whether it is connected via wifi or cell network and the same with Text messaging. I can text from any device and it’s already cross platform.
While we haven’t seen Allo yet I don’t think Duo/Allo are going to be able to take on Hangouts as my messaging platform of choice. I just hope Google will actually improve it.